记录常用的VPS命令
代理相关
Shadowsocks-Rust 安装管理脚本
使用
wget -O ss-rust.sh --no-check-certificate https://raw.githubusercontent.com/xOS/Shadowsocks-Rust/master/ss-rust.sh && chmod +x ss-rust.sh && ./ss-rust.sh
修改 IPV6 优先
vi /etc/ss-rust/config.json
{
    "server": "::",
    "server_port": 2525,
    "password": "passwd",
    "method": "chacha20-ietf-poly1305",
    "fast_open": false,
    "mode": "tcp_and_udp",
    "user":"nobody",
    "timeout":300,
    "nameserver":"8.8.8.8",
    "ipv6_first": true
}
Snell 管理脚本
使用
wget -O snell.sh --no-check-certificate https://git.io/Snell.sh && chmod +x snell.sh && ./snell.sh
注意
- 请手动放行防火墙相应端口。
- 由于源文件
tag版本号过于混乱,目前更新只检测正式版Snell,测试版请手动下载更新。
开启BBR加速
推荐使用5.5以上内核自带的bbr速度最佳
https://roov.org/2020/03/bbr-bbrplus-bbr2/
推荐使用该脚本:bash <(curl -Lso- https://git.io/kernel.sh)
运行 VPS ToolBox
bash <(curl -Lso- https://sh.vps.dance/toolbox.sh)
# 国内机如果不能用, 可尝试切换镜像
# bash <(curl -Lso- https://sh.vps.dance/toolbox.sh) fastgit
wget -O box.sh https://raw.githubusercontent.com/BlueSkyXN/SKY-BOX/main/box.sh && chmod +x box.sh && clear && ./box.sh
依赖 curl 命令
Ubuntu/Debian 执行 apt update -y && apt install -y curl
Centos/Redhat 执行 yum update -y && yum install -y curl
源码
https://github.com/VPSDance/scripts
docker 相关
海外服务器
非大陆Docker安装
wget -qO- get.docker.com | bash
卸载Docker
sudo apt-get purge docker-ce docker-ce-cli containerd.io
sudo rm -rf /var/lib/docker
sudo rm -rf /var/lib/containerd
非大陆Docker-compose安装
 sudo curl -L "https://github.com/docker/compose/releases/download/1.29.2/docker-compose-$(uname -s)-$(uname -m)" -o /usr/local/bin/docker-compose
sudo chmod +x /usr/local/bin/docker-compose
查看版本
docker-compose --version
大陆服务器
国内机安装docker
curl -sSL https://get.daocloud.io/docker | sh
国内机安装docker-compose
curl -L https://get.daocloud.io/docker/compose/releases/download/v2.1.1/docker-compose-`uname -s`-`uname -m` > /usr/local/bin/docker-compose
chmod +x /usr/local/bin/docker-compose
卸载docker
sudo apt-get remove docker docker-engine
rm -fr /var/lib/docker/
Debian 10上安装最新版本Docker CE的步骤:
- 更新APT软件包缓存:
sudo apt-get update
- 安装所需的软件包以让APT可以通过HTTPS使用存储库:
sudo apt-get install apt-transport-https ca-certificates curl gnupg2 software-properties-common
- 添加Docker的官方GPG密钥:
curl -fsSL https://download.docker.com/linux/debian/gpg | sudo apt-key add -
- 添加Docker的官方存储库:
sudo add-apt-repository "deb [arch=amd64] https://download.docker.com/linux/debian $(lsb_release -cs) stable"
- 再次更新APT软件包缓存:
sudo apt-get update
- 确保您要安装Docker的版本:
apt-cache policy docker-ce
- 安装Docker CE:
sudo apt-get install docker-ce docker-ce-cli containerd.io
- 验证Docker是否安装成功:
sudo docker run hello-world
如果一切正常,您应该能够看到"Hello from Docker"的输出。
祝您安装成功!
Debian 10上安装Docker Compose的步骤:
- 在GitHub的Docker Compose存储库上查找最新版本的Docker Compose:
sudo curl -L "https://github.com/docker/compose/releases/latest/download/docker-compose-$(uname -s)-$(uname -m)" -o /usr/local/bin/docker-compose
注:这个命令下载最新版本的Docker Compose的二进制文件到/usr/local/bin/docker-compose。
- 将docker-compose文件设置为可执行:
sudo chmod +x /usr/local/bin/docker-compose
- 验证Docker Compose是否已成功安装:
docker-compose --version
如果一切正常,您应该看到Docker Compose的版本号。
现在您已成功在Debian 10上安装并配置了Docker Compose。这将使您更轻松地管理和部署Docker容器。

耗子头写的LS镜像站
docker run -d --name looking-glass --restart always --network host -e HTTP_PORT=8080 wikihostinc/looking-glass-server
其他Image Environment Variables详见Github站点
测试相关
机器测试
流媒体检测脚本:
bash <(curl -L -s check.unlock.media)
nexttrace
bash <(curl -Ls https://raw.githubusercontent.com/sjlleo/nexttrace/main/nt_install.sh)
使用方式
# IPv4 ICMP Trace
nexttrace 1.0.0.1
# URL
nexttrace http://example.com:8080/index.html?q=1

# 表格打印,使用 --table / -t 参数,将实时显示结果
nexttrace --table 1.0.0.1

# IPv6 ICMP Trace
nexttrace 2606:4700:4700::1111

# 禁用路径可视化 使用 --map / -M 参数
nexttrace koreacentral.blob.core.windows.net
# MapTrace URL: https://api.leo.moe/tracemap/html/c14e439e-3250-5310-8965-42a1e3545266.html
一键DD脚本(MoeClub)
wget --no-check-certificate -O AutoReinstall.sh https://git.io/AutoReinstall.sh && bash AutoReinstall.sh
记住脚本提示的登录密码:Pwd@Linux
禁用或启用 IPv6
查看VPS的IPv6信息
输入命令: ip -6 addr show scope global
或者 curl ipv6.ip.sb
禁用VPS的IPv6命令:
sysctl -w net.ipv6.conf.all.disable_ipv6=1;
sysctl -w net.ipv6.conf.default.disable_ipv6=1
如果想重启系统也生效, 执行:
sysctl -w net.ipv6.conf.all.disable_ipv6=1;
sysctl -w net.ipv6.conf.default.disable_ipv6=1
启用VPS的IPv6命令:
sysctl -w net.ipv6.conf.all.disable_ipv6=0; sysctl -w net.ipv6.conf.default.disable_ipv6=0
重新载入sysctl配置
sysctl --system # reload sysctl
如果重载, 还无效果, 可能要reboot重启下.
SWAP
wget -N --no-check-certificate https://cdn.jsdelivr.net/gh/YG-tsj/CFWarp-Pro/multi.sh && chmod +x multi.sh && ./multi.sh
Free DeepLX API
源码
https://github.com/OwO-Network/DeepLX
Run on Linux Server
bash <(curl -Ls https://cpp.li/deeplx)
Run on Mac
Homebrew (Recommended)
brew tap owo-network/brew
brew install deeplx
brew services start owo-network/brew/deeplx

# Update to the latest version
brew update
brew upgrade deeplx
brew services restart owo-network/brew/deeplx

# View the currently installed version
brew list --versions deeplx
After installation, start the daemon with the following command.
systemctl daemon-reload
systemctl enable deeplx
Setup on Bob App
Install bob-plugin-deeplx on Bob.
Setup the API.
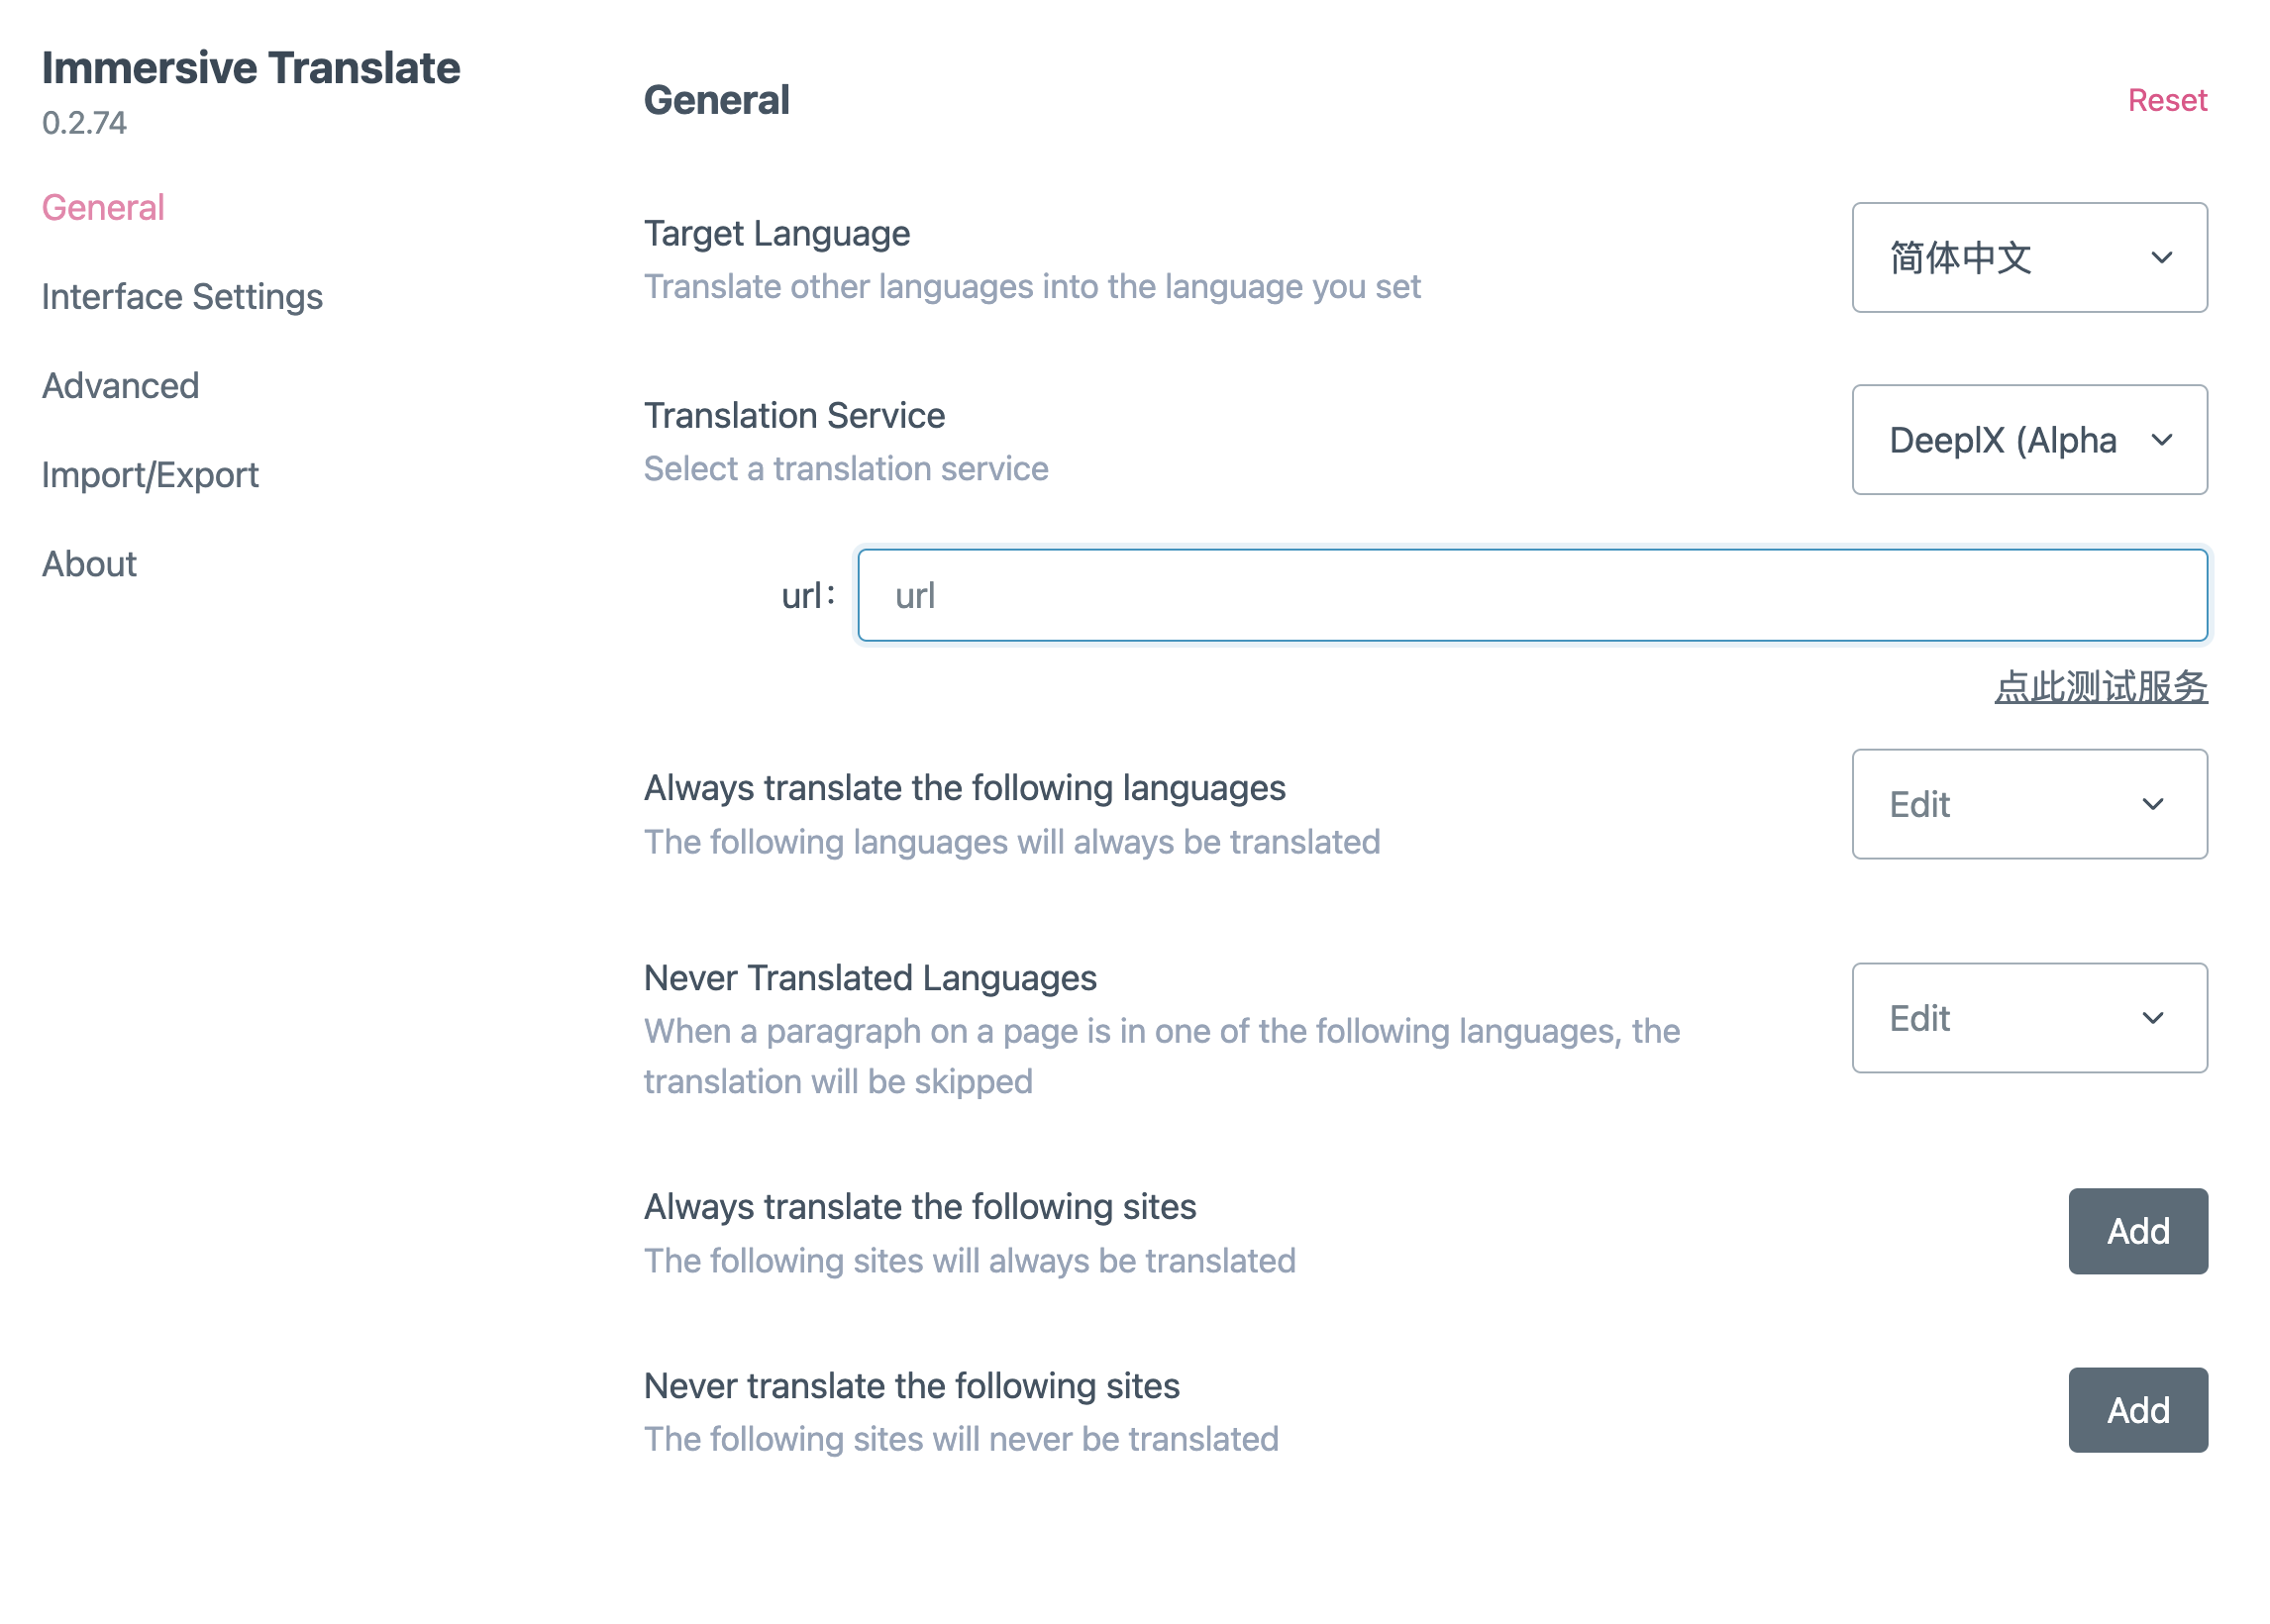
Setup on immersive-translate
Install Latest immersive-translate on your browser.
Click on Developer Settings in the bottom left corner. Enable Beta experimental features.
Set the URL.
Backup the Docker Image of zu1k
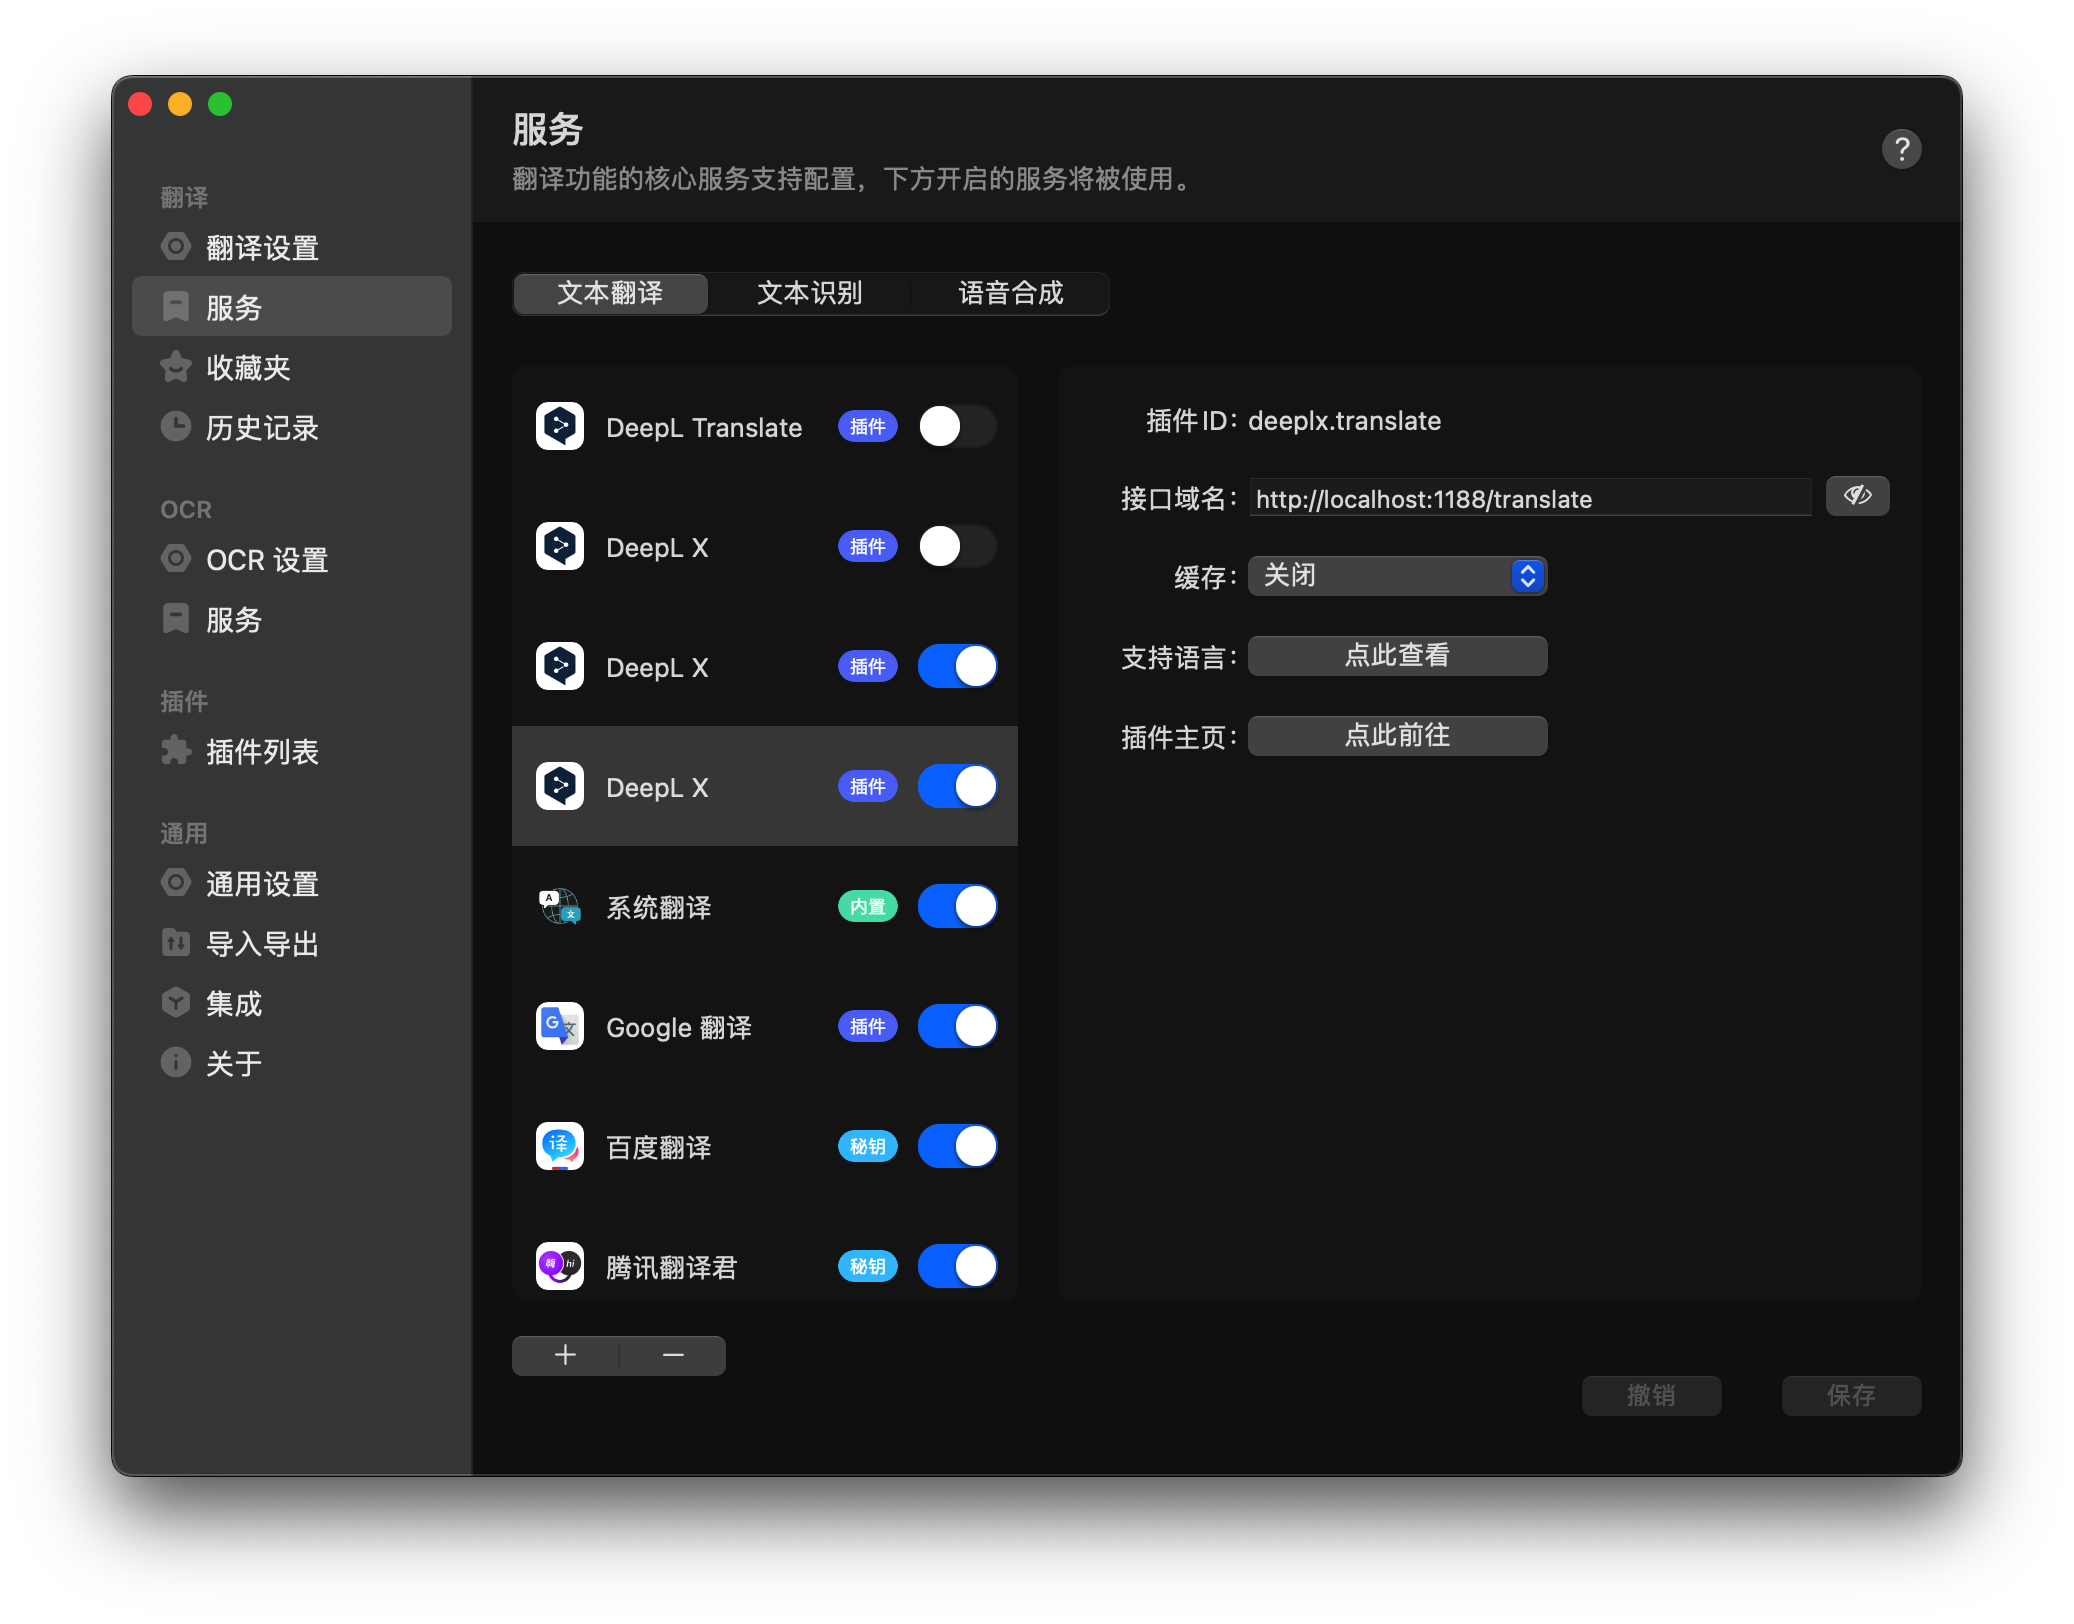
docker run -itd -p 1188:80 missuo/deeplx-bk
This docker image is not related to this project, as the original author deleted the image, it is only for backup.
Author
DeepL X © DeepL X Contributors, Released under the MIT License.
磁盘挂载
查看linux下的硬盘挂载的空间、使用空间
df -h
查看没有挂载的硬盘是否检测在系统中
- 用命令
fdisk -l查看新磁盘是否被系统识别 - 再用查看系统检测的硬盘 命令:
lsblk
挂载 (挂载完,要在/etc/fstab 下面配置挂载信息 要不然重启挂载就消失了)
使用下面命令格式化已附加上,但df -h不能看到的卷
df -T #查看磁盘sda的文件系统类型
sudo mkfs -t ext4 /dev/nvmeOn1  #备注  nvmeOn1 都是存在在/dev 下面的
创建一个要挂载的目录
sudo mkdir /data
挂载命令 把空间挂在/data 把格式化后的卷mount到一个目录
sudo mount /dev/nvmeOn1 /data
到 /etc/fstab 下配置挂载信息,添加一条记录,如有就复制一条,修改一下即可(十分重要) 如下:
/dev/nvme0n1 /data auto defaults,nofail,comment=cloudconfig 0 2
添加完毕以后可以试一下fstab文件是否能正常运行。
sudo mount -a测试是否挂载成功(如果出错,不要重启,否则就GG了)